Do you suffer from unsightly, bulging panels? Are your pickers bursting at the seams? Would you like to shed a few hundred items but still be able to enjoy a healthy choice of custom presets?

It’s easy to add new custom content to Photoshop such as brushes, layer styles and custom shapes using the Preset Manager. When we do, however, the new presets are appended to the items we already have loaded, including those that come preinstalled. They all get placed in one massive collection and we end up with a preset picker containing hundreds, if not thousands of items; needle in a haystack, anyone?
We can work around this by replacing the current set with the new one, rather than appending it. That’s not too bad if we’re choosing one of Photoshop’s default sets; we just need to go to the fly-out menu on the tool’s preset picker, or use the Presets manager.
If we want to add sets that we’ve downloaded or created ourselves, however, we must first browse to the folder where the preset is stored each time, then import them. Even if you’re meticulous with your housekeeping, that’s extra steps that you don’t necessarily want to be doing when you’re up against a deadline! There is a much better way. We can add our own presets to the fly-out menu, giving us immediate access to them straight off.
First of all, close Photoshop if it’s running. It’s not essential to do it now but we’re going to have to restart it later, so we might as well. Now we need to browse to where the user presets are stored. This depends on which OS you’re using, of course.
For the Mac, open the Finder. Go to the Go menu and select Library. Now browse to the following path:
Application Support > Adobe > Photoshop X > Presets.
Note: If you’re using OS X Lion or above, you may not see the Library folder in the list. If you hold down the Option key with the menu open, it will magically appear.
For PCs (assuming that Windows Vista/7 is being used), open Windows Explorer. Browse to the following path:
C: (or whichever drive Windows is installed on)\Users\[user]\AppData\Roaming\Adobe\Adobe Photoshop X\Presets.
Note: If the AppData folder is not visible you will need to do the following:
- Open the Control Panel from the Start Menu.
- Select Appearance and Personalization.
- Under the Folder Options heading, click Show Hidden Files and Folders.
- Select Show Hidden Files, Folders, and Drives
- Click OK to apply the setting

Now open a new Finder/Explorer window. Browse to where your custom presets are stored. Select one or more of the files – as long as they are the same type, e.g. csh for custom shapes – and copy them into the relevant folder under Presets.

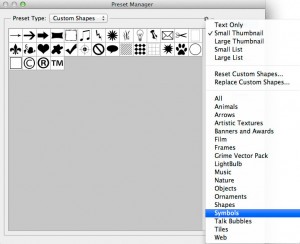
Start Photoshop up again. Go to the Presets Manager (Edit > Presets > Presets Manager). Select the relevant preset from the drop-down menu; shapes in this case. Click on the fly-out menu. All being well, we should see the presets we just added at the bottom of the menu. We can now select them in the same way we do with Photoshop’s built-in sets.
Deleting items from the menu is simply the reverse of adding them. If you decide that you no longer want a preset showing on the menu, simple delete it from the user presets folder. Restart Photoshop and it’ll be no more.

No comments:
Post a Comment