Friday 4 October 2013

Photoshop Workshop


poster5We’re delighted to announce our latest workshop! Run by Eric Renno, this workshop will look at workflow, and making the most out of Photoshop, to take you images from “Dull to Dynamic”.
 As an Adobe Certified Expert, Eric knows Photoshop inside and out and has a few tricks up his sleeve, while his experience as a lecturer (Grade 1 at last observation)  means he knows how to bring fun into learning.
 He’ll be passing on time saving ideas as well as some actions  and presets that he finds useful, all of which you’ll take home with you. This is an all day Photoshop event, sprinkled with activities and fun, with a good supply of tea and coffee. 
To keep the cost down, we’d ask you to bring a packed lunch, but what a place for a picnic! The workshop’s being help at the beautiful Rutland Water Nature Reserve and come rain or shine the view is stunning!
You’ll know by now that we like to keep the cost as low as possible, and that’s true for this workshop too. The price of this workshop is just £70.00 We’d advise you to book early to avoid disappointment and to make sure you get to enjoy this fab day out!

Thursday 20 June 2013

Coloring with Photoshop – Skin


Originally posted at TipSquirrel.com 

Photoshop Nut : Janine Smith


We’re going to perk things up a bit with a little help from history. First, we need to ask ourselves a couple of questions; what era is our image from and what era’s style do we want to borrow from? Of course, you can color your images any way you like, but personally, I like to borrow styles from the era the image was taken in. For the really old images that may mean striving for a watercolor or pastel look of a hand tinted image and portraits taken in the 40’s may call for the more saturated, glamorous style of that era. I’ll go more into the styles of each era and inspiration at a later date, but for now, since the image I’m working on was taken in the 40’s, you can go online and find an image or images from that era that appeals to you in terms of skin and hair color. You may feel like it’s wrong to borrow an image, but It’s okay to use these images for this purpose – all you’re going to do is sample color palettes, you’re not using the image or reproducing it in any other way. I liked the skin tones in this image of Rita Hayworth so I sampled some of the colors"


Wednesday 19 June 2013

Creating Torn Edges in Photoshop and Photoshop Elements

Originally posted at TipSquirrel.com 
Photoshop Nut : David Asch


The finished image of the tutorial showing a torn playing card

Hello everyone. This month I'm donning my top hat and tuxedo to perform a spectacular card trick for you.

First, I'll tear the card in half and then, without so much as a wave of a magic wand, I'll seamlessly mend it right in front of your very eyes! Seriously, though, if you've ever gone delving into the many filters available in Photoshop and Photoshop Elements, you will no doubt have come across the Torn Edges filter.

As the name suggests, it will give you a super torn edge effect on your image. Well, no, actually it won't, not if it's applied directly to the image, that is; all you'll end up creating is a fuzzy monochrome graphic element. In this tutorial, that can be used with both Photoshop and Photoshop Elements, I'll be showing you how to create a realistic torn edge using the Torn Edge filter but done in a different way.

Rather than applying the filter to the image, it will be applied to a layer mask. As we'll see, working in this way produces very different results; the effect does exactly what it's supposed to. We'll also see how filters can be layered within the Filter Gallery to create composited effects. This is a great way of creating the effect and it can be applied in many different situations. It also gives you much more control over the result than you would when using custom brushes or scanned elements.


Monday 13 May 2013

Hand Painted Border Brushes For Photoshop

photoshop border gavin hoey
Originally posted at TipSquirrel.com 
Photoshop Nut : Gavin Hoey


I’m a sucker for a border and Photoshop has a raft of ways in which you can create a border from scratch. The only downside with some Photoshop border effects is they can look digitally created and by that I mean they lack the subtle changes and randomness that only a handmade border provides. So here’s a solution. Paint your own borders and turn them into custom brushes. Since Photoshop CS6 brushes can be up to 5000 pixels long, twice the size of Photoshop CS5 and that opens up a lot more creative possibilities. To get you started we’re sharing the same brush image that you’ll see used in this video. All you need to do is download it.


This will take you to TipSquirrel.com where we'll ask you to Tweet, Plus or post to LinkedIn to reveal the brushes. This is marketing, not blackmail; ;)

Friday 26 April 2013

Originally posted at TipSquirrel.com 
Photoshop Nut : Howard Pinsky

Many Photoshop users have asked how they would be able to add multiple Strokes, or outlines, to an object. This quick tip will show you how it's possible to add 6 outlines to a single object, using Layer Styles, and a new feature in Photoshop CS6. Starting out, you need a shape. I'm using a simple star shape that comes with Photoshop's Custom Shapes Tool.


  Stroke

 Drop Shadow


Saturday 20 April 2013

Selecting Hair in Photoshop Touch

Originally posted at TipSquirrel.com 
Photoshop Nut : Eric Renno

image
Selecting hair is one of the more challenging Photoshop skills if you want to start doing compositing. Photoshop Touch makes it very easy to do, on the go, using a couple of tools and a filter. In this video I take the photo of Paige and extract her, fly away hair included, and put her on a grungy background.    

Thursday 4 April 2013

3D in Photoshop CS6 - Materials Properties

Originally posted at TipSquirrel.com
Photoshop Nut : Michael Hoffman

3D_Materials_PropertiesIn the conclusion of this segment, we will look at assigning and modifying properties of 3D objects to define transparency and reflections. We'll create a reflection on the ground plan, and make some basic adjustments to the light in the image to soften the shadows. If you missed the first part, you can find it in my post on 3D in Photoshop – Combining Objects.


Click here to see the other videos in this series


Saturday 30 March 2013

The Photoshop Show 27 - With Guest Eric Renno


In this edition of The Photoshop Show TipSquirrel Nut Eric Renno is the special guest. More editions of this great show can be found here.

"A bi-weekly web broadcast hangout show. Your hosts Jan Kabili and Ron Clifford along with a featured guest with a specialty in Photoshop and Lightroom, discuss and demonstrate post processing features and techniques and the inspiration behind the art. This show is geared toward beginner and intermediate Photoshop and Lightroom users, though many advanced techniques are also covered."


Friday 29 March 2013

Step Into Your Image with Photoshop and After Effects

Originally posted at TipSquirrel.com
Photoshop Nut : 
Eric Renno


In this video I take a flat, 2D image and transform it into a 3D image that a camera can pass into. If you’ve not worked with Vanishing Point before then you may wish to take a quick look at Multiple Planes with Photoshop (No 3D Layers). There’s two techniques here, one uses only Photoshop while the second uses Photoshop and After Effects. 

Tuesday 12 February 2013

Conditional Actions in Photoshop

Originally posted at TipSquirrel.com
Photoshop Nut : 
Richard Hales


The latest update to Photoshop (only available to Creative Cloud users, don’t blame me talk to Adobe, but I probably agree with you) included something called Conditional Actions.  Conditional Actions are a way of adding a clause to an action that will cause another action to run if the clause is applicable or another to run if it isn’t.  Clear?  No, probably not, so I’ll create a real world example to explain more clearly (hopefully).   One thing I end up doing a lot is preparing images for tutorials, this involves using the Save For Web function in Photoshop, in-putting size and quality settings, selecting a place to save the image and then close without saving.  I have two actions to do this for me, one for landscape and square images (the square action works with portrait images too), which means running a Batch command for several images would have been a fiddle and a faff. What Conditional Actions allow me to do is to create a new action that selects which of my two existing actions to run depending on whether the image is landscape or square/portrait.   To do this, open the Actions palette and create a new action (press the new icon at the bottom of the palette or use the palette's pop out menu)

  Create a New Action   

Name it as you wish but make sure that you save the action the set where the actions you are going to use are located.  Don’t worry about pressing record as you do not need to be recording to create a Conditional.   Go back to the pop out menu and click on “Insert Conditional…”   opens the Conditional Action dialogue box

Conditional Actions 

Wednesday 30 January 2013

Image Variations with Photoshop Gradient Maps

Originally posted at TipSquirrel.com
Photoshop Nut : 
Michael Hoffman


GradientMap-01If you look in Photoshop’s Adjustments Panel, right at the very bottom, in the last position, there is the really technical sounding “Gradient Map.” If you haven’t seen this adjustment in action, or known what it can do, you’d be entirely likely to pass right over it – it sounds complicated. But, it isn't  Gradient Maps are one of the simplest ways of toning or tinting an image. In fact, if you like to tinker with your image, searching for a certain “look,” the Gradient Map can provide a seemingly endless train of color variations, all with a few clicks. Let’s see how it works.

 We’ll start with the image above, and very quickly, we can open the Adjustments Panel and click Gradient Map (Or, if you prefer menus, Image > Adjustments > Gradient Map… will get you there). The adjustment layer is added, and the Property Panel opens, showing the gradient picker and controls:

GradientMap-02
 

At this point, the default gradient is applied to your image, in a very predictable way. Looking at the gradient from left to right, the colors on the left are applied to the darkest tones in your image, and the colors on the right are applied to the lightest tones – with the tones in the gradient “mapped” to the highlights and shadows of the image. With the default black and white gradient, this gives us a black and white image, like so:

GradientMap-03
 

 Now, this in itself isn’t really amazing or surprising – after all, there are dozens of ways to get a grayscale image within Photoshop. No, the variations come as we change the gradient, which is mapped to the image tones. We can click the drop down arrow next to the gradient and pick a different gradient (such as Copper), which is mapped onto the image tones the same way:


Monday 28 January 2013

Cutting the fringe – Selective Colour in Photoshop

Originally posted at TipSquirrel.com
Photoshop Nut : 
Scot Baston


I encountered a little problem the other day while creating something in Photoshop.. not my usual photography but pulling some low resolution text from a black background. Normally the route would be to create a selection and to use refine mask to remove any stray edges of the background. In this case the text was so small and with the compression on the original file, the refine edge option was not working for me, especially when you add in the complexity of the shape. Below is an example of what I had to work with..

cuttingthefringe

my final image would be on a white background, so lets try the normal route first
  cuttingthefringe2
As you can see, selecting the black background and using refine edge did not create the best result when shown on a white background. I'm sure better could be achieved by taking the time, zooming in to the text and using the refine edge brush around each of the letters.. but who has time for that? First steps first.. lets select the text from the black background. Using the Magic Wand tool (W), set the tolerance to around 10 and uncheck the contiguous checkbox.. then select the black background

  cuttingthefringe4 

 With the Background selected, create an inverted layer mask by holding down the Alt key and clicking the 'add layer mask' button at the bottom of the layer mask panel.

cuttingthefringe5
 

 Adding a simple white background layer underneath the cut out layer shows our current text with accompanying black fringe.

cuttingthefringe6
 

 So how to get rid of the horrible black fringe without losing the feel of the text and without spending ages refining the mask. My solution was to use the Selective Colour Adjustment Layer...

Saturday 26 January 2013

Lightroom 4 Adjustment Brush Tricks

Originally posted at TipSquirrel.com
Photoshop Nut : 
Michael Hoffman

Lightroom 4 Adjustment Brush Tricks
Lightroom 4 brings all the same capabilities you'll find in Camera Raw for the Adjustment Brush, as well as the Graduated Filter. Add multiple effects, control your image non-destructively. Plus, Lightroom adds some nifty controls all its own to make your editing more efficient.


Monday 21 January 2013

Symmetry with Photoshop

Originally posted at TipSquirrel.com
Photoshop Nut : Gavin Hoey


TS-SymmetricalAs a photographer symmetry is one of the hardest types of composition you can find. Nature has a habit of avoiding symmetry most of the time. You’ll never walk through a forest and find two identical trees and you’ll never see the left side of the sky perfectly matching the right. However it is dead easy to create symmetrical images using Photoshop, the knack is disguising the fact that you used Photoshop at all. In this video I’ll show you how to mirror an image and then apply a few tweaks to complete the perfect symmetric photo.


Sunday 20 January 2013

Photoshop Clipping Masks

Astonishing chocolate swirlOriginally posted at TipSquirrel.com
Photoshop Nut : Eric Renno

In this video I take a look at Clipping masks. They are really easy to create and have a whole host of applications. This video was made in response to a question in the Google Plus Community; Photoshop and Lightroom Users where I’m one of the moderators. i think it goes without saying, I’d love to see and chat to you there!


Saturday 12 January 2013

From The TipSquirrel.com Archive : Shooting Tethered in Lightroom

Originally posted at TipSquirrel.com
Photoshop Nut : Scot Baston

One of the fantastic things about Lightroom is the way it can streamline a photographer's workflow. Lightroom allows the creating of presets and applying them over a complete shoot, even applying those presets on import ( see my previous tutorial). These can save hours of boring, time consuming, repetitive post production that benefits neither the client or the photographer. Recently I had to shoot a series of product shots for a client, each shot would be set up exactly the same and would require the same post processing. Now using presets I could shoot all of the images, import them into Lightroom and apply a preset to all of the images, but the finished images could not be reviewed until the shoot was complete. This might mean going back and reshooting which would be time consuming and expensive. Shooting Tethered A better way would be to shoot tethered in Lightroom. For those that don't know, shooting tethered is having your computer (and Lightroom) connected directly to your camera during the shoot. No more looking at the back of the camera and trying to figure out if the images are in focus, no more massive upload at the end of a shoot, and much less guesswork as to the look of the final image. Most DLSR's today have the ability to shoot tethered using a simple USB cable connected to both the camera and your computer. In my example I had my camera set up on a tripod directly above my studio setup and a USB cable connecting the camera to my laptop & Lightroom.

Setting up Lightroom for shooting tethered

Start tethering 


Saturday 5 January 2013

From The TipSquirrel.com Archive : Getting Started in HDR Pro

Originally posted at TipSquirrel.com
Photoshop Nut : Richard Harrington


HDR_Stones_In this exclusive video for TipSquirrel.com Rich Harrington show’s us how to get our images into HDR Pro and what to do with them once they’re there!      

Books_Amazon_Harrington

Friday 4 January 2013

From The TipSquirrel.com Archive : Vintage Effects with Photoshop

Originally posted at TipSquirrel.com
Photoshop Nut : 


imageJustin Seeley returns to TipSquirrel.com with a video looking at a couple of ways to get a vintage effect using adjustment layers in Photoshop. Don’t forget to check out Justin’s brilliant series’ at Lynda.com where he presents tutorials on a range of subjects from Facebook and Pinterest to Magento Ga and Illustrator!


Thursday 3 January 2013

From The TipSquirrel.com Archive : Building an ebook in Lightroom

Originally posted at TipSquirrel.com
Photoshop Nut : Scot Baston


Today I thought I would try something a little different.. How about creating a book in Adobe Lightroom 4, converting it to an ebook and publishing it to the Apple iTunes (and Blurb book store). Does that sound different enough? The finished ebook will be available in the epub format used by Apple iPad and iPhone and should look something like this.. [caption id="attachment_14869" align="aligncenter" width="600"]Zooming Feet Wedding ebook free ebook created using Lightroom 4 and Blurb[/caption] So lets get started.. Select the images you would like to use in your ebook and go to the Book module Adobe Lightroom 4 Book Module 
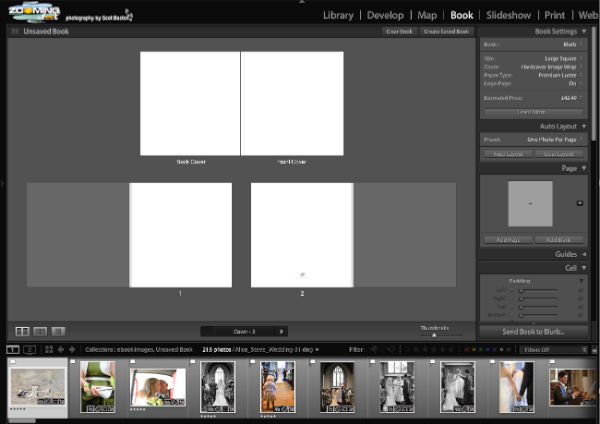
As you can see above, all my images are showing in the bottom panel ready for placement. Before that, we need to set the defaults for our ebook. ebook settings Do not be put off by the price in the screenshot above.. Lightroom only understands physical books at the moment and in this example we can create an ebook for free! I have chosen a square format book for this example, although the Standard Portrait might be a better option for creating an iPad ebook. So lets get started and create our front and back page.. format the first ebook page Select the first page and click the little arrow in the Page panel on the right. This will bring up the pre-formatted options. As I want both the front and back covers to be full page photos I choose the 1st option. [caption id="attachment_14872" align="aligncenter" width="599"]Drag and Drop the image onto the page Drag and Drop the image onto the page[/caption] Now, select an image from the film strip and drag it into place on your page. Using this multi page view is very handy for getting the overall order of your images in your ebook, but to fine tune how the page looks it is best to switch to either the double or single spread views Page Views With the Double Page Spread view selected I can position my cover image by dragging the image and changing the zoom settings. Positioning the cover image Now we can create a title for our cover page by ticking the Page Caption box in the Caption panel. Creating a Title There are many formatting options that allow placement and styling of the text. One thing to consider if, as in this example, we are creating for the iPad is the choice of Fonts. Blurb advise that you use one the following fonts to prevent formatting errors when converting to iPad format. Helvetica, Century Schoolbook, Futura, Verdana, Courier, Arial, Garamond, Trebuchet, Georgia and Times. I have not used fonts from the selection in this example but Blurb allows you to alter this during the conversion process. Adding pages could not be easier.. Adding new pages Keep adding and populating your pages until you have a completed book. Now Save the book by clicking the Create Saved Book button in the top right.. Create Saved Book The book is now ready to send to Blurb to be converted to an ebook. Send to Blurb This will bring up a loading page for Blurb.. do not be put off by the price as we use this book to create an ebook. Loading ebook Be aware that this uploading process may take a while.. make some tea, maybe even lunch and supper while you are at it. When it is finally complete, a web page will automatically open at the blurb website. Convert to ebook As you can see there is a link to automatically convert you Lightroom created Book into an ebook. Click the link. ebook creation page Click continue and you will be asked to convert any non standard fonts Change fonts The Blurb website will then notify you of any formatting issues and help you to correct them Correcting formatting problems Click the page number to take you to the page (Page 1 in this case).. Fit the text The warning tells us that the text overflows the text box. This is simple to fix by either changing the font size or in this case, making the text box a little bigger. Publish ebook Once you have fixed any minor problems with formatting, click the Complete and Publish button in the bottom right. Blurb Book Store Test your new ebook by downloading it to an iPad or iPhone to make sure that the formatting looks fine. Publish to Blurb and Apple When you are happy with your downloaded ebook, you can now add it to the Blurb bookstore and submit it to Apple iBookstore (if you want your ebook on iTunes). The submission to Apple can take up to 2 weeks, although can happen much quicker. Now everything is done! You can preview your ebook in the blurb bookstore and others can download it for their own viewing pleasure. Blurb Bookstore preview and for those who want to see the finished result.. Download the ebook from Blurb or iBookstore     I hope you managed to stick with me through this process, it is easier to do than explain! If you would like to find out more about Blurb and Adobe Lightroom 4 book creation.. Please check out Richard Curtis' upcoming webinar on creating extraordinary blurb books in Lightroom    As always, please ask questions or comments below and feel free to share the knowledge.