
Sometimes it's good to take a step back and have a little fun with Photoshop. Try new filters, new blend modes... experiment a bit!
Photoshop CS6 offers plenty of opportunity for this with new features like Blur Gallery, greatly improved Lighting Effects, and the new Oil Paint filter, which we'll talk about here. Traditionally most creative or painterly filters end up in the Filter Gallery, but the Oil Paint filter is a new breed. It has been accelerated to take advantage of fast GPUs (or graphics cards) and provides instantaneous feedback as you adjust the settings, and you can find it right at the top of the menu!

Smart Oil Paint Filter
As a starting point, it's usually a good idea to convert the layer you're going to work on into a Smart Object (or Smart Filter) layer. In this case, I've given myself a head-start by opening the raw image as a Smart Object. Once you've done that, chose Filter > Oil Paint. Next you'll want to zoom in to at least 33 or 50% on most photos, more so if they're very large. The idea is that you want to see the contrast edges as well as some of the grain and detail in the shot.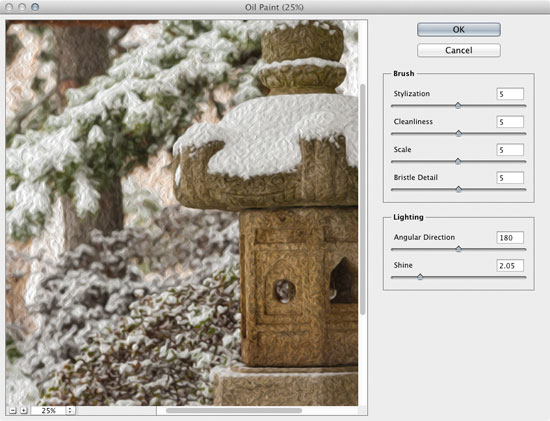 To test things out, move the Stylization control from side to side and watch the preview as you do so; can you see any obvious changes? If not, you need to zoom in at least one more level. The Stylization control has an interesting effect. The best analogy I can make is that the lower values give the simulated oil paint a more random and almost clumpy appearance, almost like it was painted onto a rougher canvas or with an older brush that had lots of dried paint on it. Personally I like oil paintings to have a smoother look so I set this example to a value just over 7 (the max is 10).
Brush Controls
The Cleanliness slider has a similar effect to Stylization except that it tends to break up the contrast lines (i.e. simulated paint streaks). The lower the value, the more broken the paint lines appear to be. You might think of boosting this setting as well however I think it adds an element of realism to keep the value under 5. After all if we're painting with human hands and not robot hands, we're probably going to have an element of waviness to the contrasts we create with a real paint brush, so it should be the same with digital. The Scale control is pretty important and it's one you'll want to zoom out to evaluate as you make the setting. Think about the relative size the image will be viewed at and try to mimic that level of magnification if you can. The larger the scale, the more obvious the paint patterns will be. Move the slider back and forth a couple times to get a sense for what the effect does. I usually settle on a value between 3 and 7. As with the prior two settings, the max is 10 and decimals are used so the options are fairly precise.
 The last brush control is Bristle Detail and you can think of this as mimicking the look of a brush that shows individual bristle lines vs very smooth paint strokes. I usually leave this value quite high depending on the first couple settings. If you make it too low I think it loses the character of oil paint a bit. This is one you'll want to be zoomed in with to see clearly. Even then it can be a little tough.

Lighting
The Angular Direction control will "rotate" the effect (e.g. moving from 180 to 360 is basically inverting the contrast lines to create the sense that light is shining on the canvas from the opposite direction), while the Shine control will change the oil paint from looking flat to looking wet (i.e. more reflective in the bright areas). Try to rotate the effect so that it runs parallel to the most important visual lines in your image (or specific textures you want to highlight). The Shine can put the finishing touch on the shot and make the difference between something that looks like paint or not. With these two controls it's generally best to zoom out a bit to normal viewing magnifications.
 The final result is shown below. When you're done, click OK to apply the filter to your new Smart Object layer, then double click the filter name (below the layer) any time you want to revise your settings. Tip: Don't forget to rasterize your smart filter layer before scaling your oil painting!
[caption id="attachment_14612" align="aligncenter" width="550"]
The final result is shown below. When you're done, click OK to apply the filter to your new Smart Object layer, then double click the filter name (below the layer) any time you want to revise your settings. Tip: Don't forget to rasterize your smart filter layer before scaling your oil painting!
[caption id="attachment_14612" align="aligncenter" width="550"]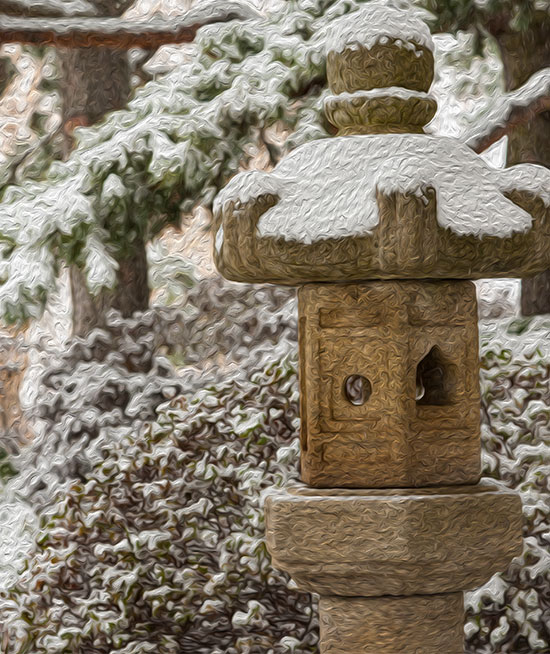 Snow Statue © Dan Moughamian[/caption]
No comments:
Post a Comment