Friday, 26 April 2013

Originally posted at TipSquirrel.com 
Photoshop Nut : Howard Pinsky

Many Photoshop users have asked how they would be able to add multiple Strokes, or outlines, to an object. This quick tip will show you how it's possible to add 6 outlines to a single object, using Layer Styles, and a new feature in Photoshop CS6. Starting out, you need a shape. I'm using a simple star shape that comes with Photoshop's Custom Shapes Tool.


  Stroke

 Drop Shadow


Saturday, 20 April 2013

Selecting Hair in Photoshop Touch

Originally posted at TipSquirrel.com 
Photoshop Nut : Eric Renno

image
Selecting hair is one of the more challenging Photoshop skills if you want to start doing compositing. Photoshop Touch makes it very easy to do, on the go, using a couple of tools and a filter. In this video I take the photo of Paige and extract her, fly away hair included, and put her on a grungy background.    

Thursday, 4 April 2013

3D in Photoshop CS6 - Materials Properties

Originally posted at TipSquirrel.com
Photoshop Nut : Michael Hoffman

3D_Materials_PropertiesIn the conclusion of this segment, we will look at assigning and modifying properties of 3D objects to define transparency and reflections. We'll create a reflection on the ground plan, and make some basic adjustments to the light in the image to soften the shadows. If you missed the first part, you can find it in my post on 3D in Photoshop – Combining Objects.


Click here to see the other videos in this series


Saturday, 30 March 2013

The Photoshop Show 27 - With Guest Eric Renno


In this edition of The Photoshop Show TipSquirrel Nut Eric Renno is the special guest. More editions of this great show can be found here.

"A bi-weekly web broadcast hangout show. Your hosts Jan Kabili and Ron Clifford along with a featured guest with a specialty in Photoshop and Lightroom, discuss and demonstrate post processing features and techniques and the inspiration behind the art. This show is geared toward beginner and intermediate Photoshop and Lightroom users, though many advanced techniques are also covered."


Friday, 29 March 2013

Step Into Your Image with Photoshop and After Effects

Originally posted at TipSquirrel.com
Photoshop Nut : 
Eric Renno


In this video I take a flat, 2D image and transform it into a 3D image that a camera can pass into. If you’ve not worked with Vanishing Point before then you may wish to take a quick look at Multiple Planes with Photoshop (No 3D Layers). There’s two techniques here, one uses only Photoshop while the second uses Photoshop and After Effects. 

Tuesday, 12 February 2013

Conditional Actions in Photoshop

Originally posted at TipSquirrel.com
Photoshop Nut : 
Richard Hales


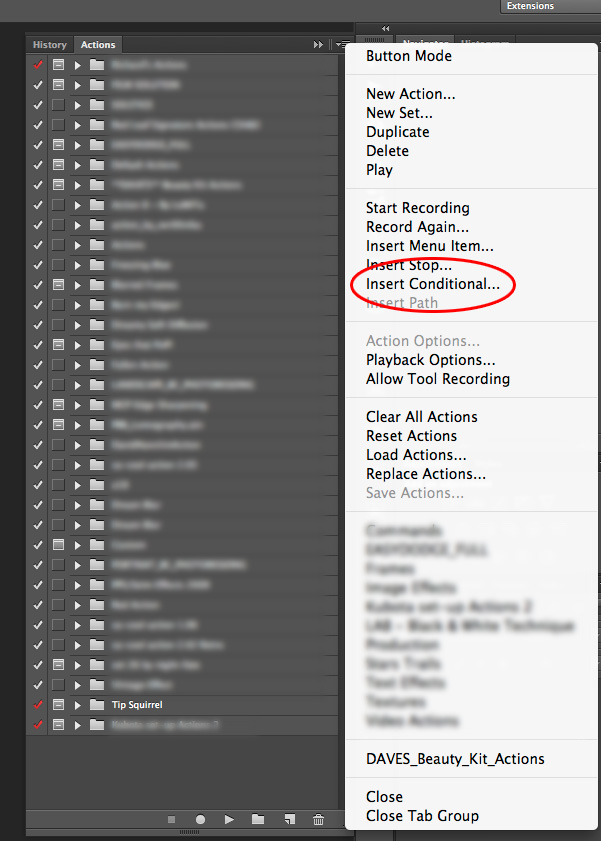
The latest update to Photoshop (only available to Creative Cloud users, don’t blame me talk to Adobe, but I probably agree with you) included something called Conditional Actions.  Conditional Actions are a way of adding a clause to an action that will cause another action to run if the clause is applicable or another to run if it isn’t.  Clear?  No, probably not, so I’ll create a real world example to explain more clearly (hopefully).   One thing I end up doing a lot is preparing images for tutorials, this involves using the Save For Web function in Photoshop, in-putting size and quality settings, selecting a place to save the image and then close without saving.  I have two actions to do this for me, one for landscape and square images (the square action works with portrait images too), which means running a Batch command for several images would have been a fiddle and a faff. What Conditional Actions allow me to do is to create a new action that selects which of my two existing actions to run depending on whether the image is landscape or square/portrait.   To do this, open the Actions palette and create a new action (press the new icon at the bottom of the palette or use the palette's pop out menu)

  Create a New Action   

Name it as you wish but make sure that you save the action the set where the actions you are going to use are located.  Don’t worry about pressing record as you do not need to be recording to create a Conditional.   Go back to the pop out menu and click on “Insert Conditional…”   opens the Conditional Action dialogue box

Conditional Actions 

Wednesday, 30 January 2013

Image Variations with Photoshop Gradient Maps

Originally posted at TipSquirrel.com
Photoshop Nut : 
Michael Hoffman


GradientMap-01If you look in Photoshop’s Adjustments Panel, right at the very bottom, in the last position, there is the really technical sounding “Gradient Map.” If you haven’t seen this adjustment in action, or known what it can do, you’d be entirely likely to pass right over it – it sounds complicated. But, it isn't  Gradient Maps are one of the simplest ways of toning or tinting an image. In fact, if you like to tinker with your image, searching for a certain “look,” the Gradient Map can provide a seemingly endless train of color variations, all with a few clicks. Let’s see how it works.

 We’ll start with the image above, and very quickly, we can open the Adjustments Panel and click Gradient Map (Or, if you prefer menus, Image > Adjustments > Gradient Map… will get you there). The adjustment layer is added, and the Property Panel opens, showing the gradient picker and controls:

GradientMap-02
 

At this point, the default gradient is applied to your image, in a very predictable way. Looking at the gradient from left to right, the colors on the left are applied to the darkest tones in your image, and the colors on the right are applied to the lightest tones – with the tones in the gradient “mapped” to the highlights and shadows of the image. With the default black and white gradient, this gives us a black and white image, like so:

GradientMap-03
 

 Now, this in itself isn’t really amazing or surprising – after all, there are dozens of ways to get a grayscale image within Photoshop. No, the variations come as we change the gradient, which is mapped to the image tones. We can click the drop down arrow next to the gradient and pick a different gradient (such as Copper), which is mapped onto the image tones the same way: