Originally posted at TipSquirrel.com
Photoshop Nut : Scot Baston
Today I thought I would try something a little different.. How about creating a book in Adobe Lightroom 4, converting it to an ebook and publishing it to the Apple iTunes (and Blurb book store). Does that sound different enough?
The finished ebook will be available in the epub format used by Apple iPad and iPhone and should look something like this..
[caption id="attachment_14869" align="aligncenter" width="600"]

free ebook created using Lightroom 4 and Blurb[/caption]
So lets get started..
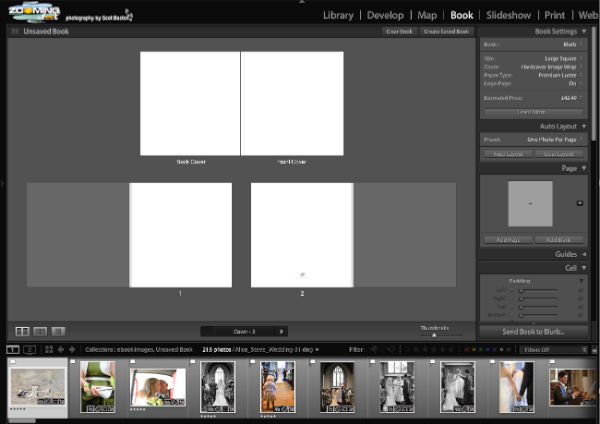
Select the images you would like to use in your ebook and go to the Book module

As you can see above, all my images are showing in the bottom panel ready for placement. Before that, we need to set the defaults for our ebook.

Do not be put off by the price in the screenshot above.. Lightroom only understands physical books at the moment and in this example we can create an ebook for free!
I have chosen a square format book for this example, although the Standard Portrait might be a better option for creating an iPad ebook.
So lets get started and create our front and back page..

Select the first page and click the little arrow in the Page panel on the right. This will bring up the pre-formatted options. As I want both the front and back covers to be full page photos I choose the 1st option.
[caption id="attachment_14872" align="aligncenter" width="599"]

Drag and Drop the image onto the page[/caption]
Now, select an image from the film strip and drag it into place on your page. Using this multi page view is very handy for getting the overall order of your images in your ebook, but to fine tune how the page looks it is best to switch to either the double or single spread views

With the Double Page Spread view selected I can position my cover image by dragging the image and changing the zoom settings.

Now we can create a title for our cover page by ticking the Page Caption box in the Caption panel.

There are many formatting options that allow placement and styling of the text. One thing to consider if, as in this example, we are creating for the iPad is the choice of Fonts. Blurb advise that you use one the following fonts to prevent formatting errors when converting to iPad format.
Helvetica, Century Schoolbook, Futura, Verdana, Courier, Arial, Garamond, Trebuchet, Georgia and Times.
I have not used fonts from the selection in this example but Blurb allows you to alter this during the conversion process.
Adding pages could not be easier..

Keep adding and populating your pages until you have a completed book.
Now Save the book by clicking the Create Saved Book button in the top right..

The book is now ready to send to Blurb to be converted to an ebook.

This will bring up a loading page for Blurb.. do not be put off by the price as we use this book to create an ebook.

Be aware that this uploading process may take a while.. make some tea, maybe even lunch and supper while you are at it. When it is finally complete, a web page will automatically open at the blurb website.

As you can see there is a link to automatically convert you Lightroom created Book into an ebook. Click the link.

Click continue and you will be asked to convert any non standard fonts

The Blurb website will then notify you of any formatting issues and help you to correct them

Click the page number to take you to the page (Page 1 in this case)..

The warning tells us that the text overflows the text box. This is simple to fix by either changing the font size or in this case, making the text box a little bigger.

Once you have fixed any minor problems with formatting, click the Complete and Publish button in the bottom right.

Test your new ebook by downloading it to an iPad or iPhone to make sure that the formatting looks fine.

When you are happy with your downloaded ebook, you can now add it to the Blurb bookstore and submit it to Apple iBookstore (if you want your ebook on iTunes).
The submission to Apple can take up to 2 weeks, although can happen much quicker.
Now everything is done! You can preview your ebook in the blurb bookstore and others can download it for their own viewing pleasure.

and for those who want to see the finished result..
Download the ebook from Blurb
or

I hope you managed to stick with me through this process, it is easier to do than explain!
If you would like to find out more about Blurb and Adobe Lightroom 4 book creation.. Please check out Richard Curtis' upcoming webinar on
creating extraordinary blurb books in Lightroom
As always, please ask questions or comments below and feel free to share the knowledge.