Labels

Showing posts with label Lightroom. Show all posts

Friday, 20 June 2014

Lightroom Adjustment Brush Presets

adjustment brush presetsby Michael Hoffman

The introduction of the Local Adjustment Brush back in Lightroom 2 was the first step in transforming Lightroom from a global editor to a fully parametric, flexible content enhancement editor. The adjustment brush capabilities have improved with every release of Lightroom since then, but you may not have been aware of the existence of Adjustment Brush Presets. Adjustment Brush parameters can be set and reset at will, but Lightroom allows you to save specific settings together as an Adjustment Brush Preset. These presets may help you to speed your work and to operate more efficiently, especially in cases where you may be performing similar edits across many images. Check out the video for tips on using, creating and managing Adjustment Brush Presets. Lightroom Adjustment Brush Presets are not as powerful and flexible as their Photoshop brush cousins, but they are still quite useful. Keep in mind the main limitation of the Adjustment Brush Presets:

Adjustment Brush Presets store develop parameters only!


The Adjustment Brush Presets don’t contain brush tip parameters such as size, density, flow or feather. Furthermore, the actual shape of the area you have brushed on your image isn’t stored in the preset. With those limitations in mind, you’re ready to begin to use and create Lightroom Adjustment Brush Presets, as demonstrated here in the video. If you want to see more creative tips, check out my video on Lightroom adjustment brush tricks.


First published at TipSquirrel.com

Monday, 5 May 2014

Lightroom 5 – Keyboard Shortcuts

Lightroom 5 Keyboard Shortcuts
Originally posted at TipSquirrel.com 
Photoshop Nut : Michael Hoffman 

Everybody loves keyboard shortcuts, and today on TipSquirrel, we have Lightroom 5 Keyboard Shortcuts for you!

Learning keyboard shortcuts can help boost your productivity and can be the key to a smooth and consistent workflow. In addition, you’re taking some of the work away from your mouse, and that can be a benefit if you tend to suffer from repetitive motion stress.

There are a few Lightroom 5 keyboard shortcuts everyone should know – for example, the big three in my mind are “G, E, D” (for grid view, loupe view, and develop module view). And there’s “R” for the crop tool. But there are oh, so many more Lightroom 5 keyboard shortcuts.

The attached reference chart, in PDF format, is available for you to download, and it contains a list of no less than 6 pages of keyboard shortcuts, organized by Lightroom task, and easily searchable.


Saturday, 12 April 2014

Lightroom Mobile Quick Setup Guide

Originally posted at TipSquirrel.com 
Photoshop Nut : Michael Hoffman 


Lightroom Mobile
As you may have noticed, Adobe has just released Lightroom 5.4, along with the new Lightroom Mobile for iPad. Lightroom mobile extends your workflow beyond the desktop, and onto your iPad, where you can review, rate and even edit your images, and have the changes synchronized automatically back to your main catalog.

Lightroom uses the Creative Cloud storage services as the hub for this synchronization, and as a result, you must be a member of one of the subscription services for this to work, including any of the Creative Cloud plans, or the Photoshop Photography Program.

The iPad app is completely free, so this is just another benefit of the Creative Cloud subscription. Lightroom Mobile uses Collections as the basis for synchronization, so make sure you are familiar with using Collections in Lightroom to support this workflow.

Setting up Lightroom Mobile isn’t very difficult, but there are a few things that must be done in the proper sequence for it to work. Let’s step through the basics of getting things rolling.

First, download the new programs

You’ll need to download and install the new update for Lightroom 5.4 for your desktop. You can find it here:
You’ll also want to download Lightroom Mobile for iPad. You can find it here:
Once you’ve completed the downloads, you’re ready to move on.

Next, configure Lightroom on the Desktop


When you start Lightroom 5.4, you’ll notice a change where the Identity plate used to be. Now, there’s a new identity section with a place for you to configure your settings with Lightroom Mobile.

Lightroom Mobile - 01


Clicking the link to “Get started with Lightroom mobile” beings up a menu with a selection to enable you to sign in with your Adobe ID:


  Lightroom Mobile - 02


Click here to see the rest of this article at TipSquirrel.com, the free website for everything Photoshop


Saturday, 26 January 2013

Lightroom 4 Adjustment Brush Tricks

Originally posted at TipSquirrel.com
Photoshop Nut : 
Michael Hoffman

Lightroom 4 Adjustment Brush Tricks
Lightroom 4 brings all the same capabilities you'll find in Camera Raw for the Adjustment Brush, as well as the Graduated Filter. Add multiple effects, control your image non-destructively. Plus, Lightroom adds some nifty controls all its own to make your editing more efficient.


Saturday, 12 January 2013

From The TipSquirrel.com Archive : Shooting Tethered in Lightroom

Originally posted at TipSquirrel.com
Photoshop Nut : Scot Baston

One of the fantastic things about Lightroom is the way it can streamline a photographer's workflow. Lightroom allows the creating of presets and applying them over a complete shoot, even applying those presets on import ( see my previous tutorial). These can save hours of boring, time consuming, repetitive post production that benefits neither the client or the photographer. Recently I had to shoot a series of product shots for a client, each shot would be set up exactly the same and would require the same post processing. Now using presets I could shoot all of the images, import them into Lightroom and apply a preset to all of the images, but the finished images could not be reviewed until the shoot was complete. This might mean going back and reshooting which would be time consuming and expensive. Shooting Tethered A better way would be to shoot tethered in Lightroom. For those that don't know, shooting tethered is having your computer (and Lightroom) connected directly to your camera during the shoot. No more looking at the back of the camera and trying to figure out if the images are in focus, no more massive upload at the end of a shoot, and much less guesswork as to the look of the final image. Most DLSR's today have the ability to shoot tethered using a simple USB cable connected to both the camera and your computer. In my example I had my camera set up on a tripod directly above my studio setup and a USB cable connecting the camera to my laptop & Lightroom.

Setting up Lightroom for shooting tethered

Start tethering 


Thursday, 3 January 2013

From The TipSquirrel.com Archive : Building an ebook in Lightroom

Originally posted at TipSquirrel.com
Photoshop Nut : Scot Baston


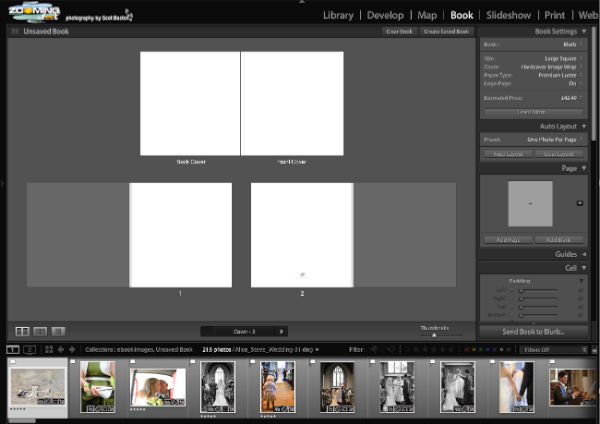
Today I thought I would try something a little different.. How about creating a book in Adobe Lightroom 4, converting it to an ebook and publishing it to the Apple iTunes (and Blurb book store). Does that sound different enough? The finished ebook will be available in the epub format used by Apple iPad and iPhone and should look something like this.. [caption id="attachment_14869" align="aligncenter" width="600"]Zooming Feet Wedding ebook free ebook created using Lightroom 4 and Blurb[/caption] So lets get started.. Select the images you would like to use in your ebook and go to the Book module Adobe Lightroom 4 Book Module As you can see above, all my images are showing in the bottom panel ready for placement. Before that, we need to set the defaults for our ebook. ebook settings Do not be put off by the price in the screenshot above.. Lightroom only understands physical books at the moment and in this example we can create an ebook for free! I have chosen a square format book for this example, although the Standard Portrait might be a better option for creating an iPad ebook. So lets get started and create our front and back page.. format the first ebook page Select the first page and click the little arrow in the Page panel on the right. This will bring up the pre-formatted options. As I want both the front and back covers to be full page photos I choose the 1st option. [caption id="attachment_14872" align="aligncenter" width="599"]Drag and Drop the image onto the page Drag and Drop the image onto the page[/caption] Now, select an image from the film strip and drag it into place on your page. Using this multi page view is very handy for getting the overall order of your images in your ebook, but to fine tune how the page looks it is best to switch to either the double or single spread views Page Views With the Double Page Spread view selected I can position my cover image by dragging the image and changing the zoom settings. Positioning the cover image Now we can create a title for our cover page by ticking the Page Caption box in the Caption panel. Creating a Title There are many formatting options that allow placement and styling of the text. One thing to consider if, as in this example, we are creating for the iPad is the choice of Fonts. Blurb advise that you use one the following fonts to prevent formatting errors when converting to iPad format. Helvetica, Century Schoolbook, Futura, Verdana, Courier, Arial, Garamond, Trebuchet, Georgia and Times. I have not used fonts from the selection in this example but Blurb allows you to alter this during the conversion process. Adding pages could not be easier.. Adding new pages Keep adding and populating your pages until you have a completed book. Now Save the book by clicking the Create Saved Book button in the top right.. Create Saved Book The book is now ready to send to Blurb to be converted to an ebook. Send to Blurb This will bring up a loading page for Blurb.. do not be put off by the price as we use this book to create an ebook. Loading ebook Be aware that this uploading process may take a while.. make some tea, maybe even lunch and supper while you are at it. When it is finally complete, a web page will automatically open at the blurb website. Convert to ebook As you can see there is a link to automatically convert you Lightroom created Book into an ebook. Click the link. ebook creation page Click continue and you will be asked to convert any non standard fonts Change fonts The Blurb website will then notify you of any formatting issues and help you to correct them Correcting formatting problems Click the page number to take you to the page (Page 1 in this case).. Fit the text The warning tells us that the text overflows the text box. This is simple to fix by either changing the font size or in this case, making the text box a little bigger. Publish ebook Once you have fixed any minor problems with formatting, click the Complete and Publish button in the bottom right. Blurb Book Store Test your new ebook by downloading it to an iPad or iPhone to make sure that the formatting looks fine. Publish to Blurb and Apple When you are happy with your downloaded ebook, you can now add it to the Blurb bookstore and submit it to Apple iBookstore (if you want your ebook on iTunes). The submission to Apple can take up to 2 weeks, although can happen much quicker. Now everything is done! You can preview your ebook in the blurb bookstore and others can download it for their own viewing pleasure. Blurb Bookstore preview and for those who want to see the finished result.. Download the ebook from Blurb or iBookstore     I hope you managed to stick with me through this process, it is easier to do than explain! If you would like to find out more about Blurb and Adobe Lightroom 4 book creation.. Please check out Richard Curtis' upcoming webinar on creating extraordinary blurb books in Lightroom    As always, please ask questions or comments below and feel free to share the knowledge.

Monday, 31 December 2012

From The TipSquirrel.com Archive : Sending images by email from Lightroom


Originally posted at TipSquirrel.com
Photoshop Nut : Michael Hoffman


In the past few weeks we’ve looked at various ways to export image files from Bridge and Lightroom. In fact, in previous tips we’ve even looked at directly exporting to Social Media sites from Bridge and from Lightroom. But, what if I want to send a simple email to family or friends? Surely there must be a quick way to pick some files and send them by email? Of course you can! As long as you are using a true mail client, and not a browser based mail system, you can have Lightroom pass files directly over to the mail client. If you’re a Mac user, you’re in luck. You can create an alias to your email program, and add that as an export action to Lightroom. It’s as easy as 1, 2, 3:
  1. Follow the steps in this Adobe article to create the alias in your export actions folder;
  2. Select hard drive export (see last week’s tip) and configure the options as desired;
  3. In the section called Post Processing, choose your mail alias (see below).
LR-Mapi-01 The photos will be left in the folder where you exported them, but they will be delivered to your mail client and will be attached to a new black message. Easy! If you’re a Windows user of Lightroom, this may not seem to work well, resulting in cryptic error messages. However, there is a great free plug-in called MapiMailer that will do an even better job! MapiMailer takes care of the handoff completely transparently, delivering the images to your email client without leaving files stranded on your hard drive. Sorry Mac users, but this power is reserved only for Windows users... it will take a bit of configuring to set it up the first time, but, hey, that’s what we’re here for at TipSquirrel! If you’d like to set up MapiMailer on your system, here is what you need to do:
  • Download the MapiMailer plug-in, and extract the contents somewhere convenient. The plug-in consists of a folder named mapimailer.lrplugin, and that folder contains all the necessary files.
  • Move the extracted folder mapimailer.lrplugin to the location where Lightroom can find it. This is typically:
Windows XP: C:\Documents and Settings\username\Application Data\Adobe\Lightroom\Modules Vista / Windows 7: C:\Users\username\AppData\Roaming\Adobe\Lightroom\Modules LR-Mapi-02
  • Once you’ve placed the folder, in Lightroom, choose File > Plug-in Manager…
LR-Mapi-03
  • In the Lightroom Plug-in Manager, locate the Add button in the left panel and click it:
LR-Mapi-04
  • This will bring up the Browse for Files or Folders dialog, open to your Modules folder from above. You may need to scroll a bit to find it. Select the mapimailer.lrplugin folder that you placed a moment ago and click OK.
LR-Mapi-05
  • That should do it! MapiMailer should now show up in the left panel, with a green light and the status listed as “installed and running.” Click Done to exit the Plug-In Manager.
LR-Mapi-06 Using MapiMailer: OK, now we’ve installed it, how do we use it? It is quite simple and efficient. Start by choosing the images you want to mail, and choose File > Export… or click the Export… button: LR-Mapi-07 Next, in the Export dialog box, change the Export To: setting at the top to export to MapiMailer: LR-Mapi-08 With MapiMailer set as the Export plugin, you have access to all the same options we saw last week when exporting to hard drive – including the ability to export various file types: JPEG, TIFF, DNG, and even Original. Set these settings as desired and you’re ready to click on Export: LR-Mapi-09 But, keep in mind – we can save these settings also as presets, by clicking the Add button in the lower left. This brings up the New Preset dialog, and we can even create a separate folder to organize our mailer presets: LR-Mapi-10 You can, of course, create several different mailer presets – saving you lots of time in the future: LR-Mapi-11 Once you’ve clicked on Export, the system will launch your default mail client with a new blank message containing the images with the parameters you’ve specified: LR-Mapi-12 LR-Mapi-13 All you have to do is enter the email address and subject, and type your message. As you can see, the photos are already attached. And, as a bonus, MapiMailer cleans up behind itself – the exported files are not left cluttering up your hard drive. I hope you found this tip helpful! Let us know by leaving a comment, we love to hear from you.